Layout Editor: Properties Bar
(Not available in the Lite version)
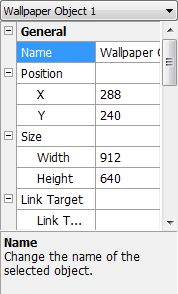
The properties bar consists of 2 parts. At the top there is a dropdown list which contains all your objects on your canvas. Select one from this list to select the corresponding object on your canvas. The special item called "::Layout" will select the layout.
Below the dropdown list there is the properties list. This list shows all the different settings for the selected object. Each object always has a set of "General" settings. The following list gives an overview of these general settings.
- Name: Allows you to give a name to the object.
- Visible: Allows you to show or hide a specific layout object.
- Position: Specifies the position of the object (in
pixels).
- X: Specifies the X-position (horizontal).
- Y: Specifies the Y-position (vertical).
- Size: Specifies the size of the object (in pixels).
- Width: The width of the object.
- Height: The height of the object.
- Link Target: Configure a link
target for this object. This link target will be executed when you
click or double click on this object on your desktop. The
screenshot below shows an example of what you could do with Link
Targets.
- Link Target: Specify the actual link target. This can be a program (executable), a document, an URL, ... See also frequently asked question 5.
- Link Target Params: Specifies some parameters that will be passed to the link target. This usually only makes sense when the link target is a program executable.
- Link Target On Single Click: When you enable this option, the link target will be executed when you single click on the object on your desktop. When this option is disabled, you have to double click on the object on your desktop.

- Effects: Allows you to apply some effects to the object. Learn more about effects.
- Ignore Wallpaper Effects: (Only available when a wallpaper object is selected.) You can assign certain effects to specific wallpapers using the Info Panel on the right of the main window. When you enable the Ignore Wallpaper Effects, these effects will be ignored and only the effects assigned to the layout object will be applied. If this is disabled, the wallpaper-specific effects will be applied before applying the layout-object effects.
Next to the above general settings, each object also has a set of object-specific settings which will appear below the general settings. These object-specific settings are explained below for each type of object.
Wallpaper Object
A wallpaper object allows you to place a wallpaper on your layout and has the following object-specific settings.
- Tiling from wallpaper: If you enable this option, you can't specify a tiling option below, instead the tiling setting of the wallpaper will be used as was set in the Info Panel of the main window.
- Tiling Setting: Specify a specific tiling setting for this wallpaper object. Learn more about the different tiling options.
- Scale: Depending on the Tiling Setting above, the Scale setting allows you to scale the wallpaper by a certain percentage.
- Alignment: Specify the alignment
of the wallpaper. So you can for example stretch to height + align
to right or other combinations.
- Alignment (Horz): Specify how the wallpaper should be aligned horizontally.
- Alignment (Vert): Specify how the wallpaper should be aligned vertically.
- "Tile" Tiling Settings: This block contains extra
options when you set the "Tiling Setting" to Tile mode.
- Tiling Columns: When the Tiling Setting is set to "Tile", you can use this setting to specify how many columns should be visible. The wallpaper is scaled such that the specified number of columns will be visible.
- Tiling Rows: When the Tiling Setting is set to "Tile", you can use this setting to specify how many rows should be visible. The wallpaper is scaled such that the specified number of rows will be visible.
- Tile Offset Mode X:
- Auto: The X-Offset will be calculated automatically based on the upper-left corner of your monitor.
- Manual: This allows you to manually specify an X-Offset in pixels.
- Center: The X-Offset will be calculated automatically such that the image in the middle will be center.
- Tiling X-Offset: Allows you to manually specify a tiling X-offset.
- Tile Offset Mode Y:
- Auto: The Y-Offset will be calculated automatically based on the upper-left corner of your monitor.
- Manual: This allows you to manually specify an Y-Offset in pixels.
- Center: The Y-Offset will be calculated automatically such that the image in the middle will be center.
- Tiling Y-Offset: Allows you to manually specify a tiling Y-offset.
- Which Wallpaper: This
setting allows you to specify which wallpaper will be displayed in
this Wallpaper Object.
- Auto: The wallpaper displayed in this Wallpaper Object is the wallpaper that Wallpaper Cycler has chosen when it cycles or is the wallpaper that you have selected when you manually set a wallpaper.
- Random from same category: This option will choose a random wallpaper from the same category as the category of the "Auto" wallpaper.
- Fixed...: This option allows you to display a fixed wallpaper with this Wallpaper Object. This can be useful to display a certain logo on all your wallpapers or to display a webcam on all your wallpapers. When you select this option, you have to specify the wallpaper you want with the "Fixed Wallpaper" option below.
- Random from any category: This option will randomly choose a wallpaper among all your wallpapers.
- Same as wallpaper object...: This option will display the same wallpaper as the linked wallpaper object, which you select with the "Same As Wallpaper Object" setting below.
- Random from fixed category...: This option will display a random wallpaper from a fixed category which you select with the "Fixed Category" option below.
- Random with given tag...: This option will display a random wallpaper that has the given tag. The tag is selected with the "With Tag" option below.
- Random from search folder...: This option will display a random wallpaper from the selected search folder. The search folder is selected with the "Search Folder" option below.
- Random from same category and with given tag...: This option will choose a random wallpaper from the same category as the category of the "Auto" wallpaper and that has the given tag. The tag is selected with the "With Tag" option below.
- Fixed Wallpaper: When you set Which Wallpaper to Fixed, use this option to specify the fixed wallpaper.
- Same As Wallpaper Object: When you set Which Wallpaper to Same as wallpaper object, use this option to specify the linked wallpaper.
- Fixed Category: When you set Which Wallpaper to Random from fixed category, use this option to specify the fixed category.
- With Tag: When you set Which Wallpaper to Random with given tag, use this option to specify the tag to use.
- Search Folder: When you set Which Wallpaper to Random from search folder, use this option to specify the search folder.
- Recursive: Enable this option to recursively choose a random wallpaper (= also look into subcategories) when you set Which Wallpaper to Random from fixed category or to Random from same category.
- Border Width: Specify the width of the border around the wallpaper. Set this to 0 if you don't want a border.
- Inside Border: If this option is enabled, the border is inside the frame you've drawn in the drawing canvas. If this option is disabled, the border will be outside the frame.
- Border Color: Specify the color of the frame around the wallpaper.
- Border Effects: If this is enabled, the effects you have setup in the general settings part of this object are also applied to the border. If this is disabled, the effects are not applied to the border.
- Corner Rounding: Specify an amount of rounding for the border.
Text Object
A text object allows you to place some text on your layout. This text can contain quotes, notes, dates, IP, ... The following is a list of the object-specific settings for a text object.
- Text: Click this button to change the text that is displayed in the text object. Learn more about the text editor.
- Linked to Wallpaper Object: Link text-commands to the selected Wallpaper Object. A text object can contain text-commands, for example %wallpapername%. When this text object is not linked to a Wallpaper Object, %wallpapername% will be replaced with the name of the wallpaper that is marked as "Auto". When this text object is linked to a specific Wallpaper object, %wallpapername% will be replaced with the name of the wallpaper that is being shown in that specific wallpaper object.
- Alignment (Horz): Specify the horizontal alignment of the actual text relative to the rectangle you've drawn in the drawing canvas. For example: when you set this to "Right", the actual text will be aligned to the right of the drawn rectangle.
- Alignment (Vert): Specify the vertical alignment of the actual text relative to the rectangle you've drawn in the drawing canvas.
- Text Effects: If this is enabled, the effects you have setup in the general settings part of this object are also applied to the text itself. If this is disabled, the effects are not applied to the text and only to the background of the text object.
- Shadow: If this is enabled, a shadow is rendered behind the text to make it better readable on all kinds of backgrounds. Note: The shadow will only be smooth on Windows XP or later, but if your text color is black, the shadow won't be smooth even on XP or later which is a bug in Windows.
- Shadow Offset: Change the offset of the shadow behind the text object (in pixels).
- Shadow Color: Change the color of the shadow behind the text object.
- Border Width: Specify the width of the border around the actual text. Set this to 0 if you don't want a border.
- Border Color: Specify the color of the frame around the actual text.
- Border Effects: If this is enabled, the effects you have setup in the general settings part of this object are also applied to the border. If this is disabled, the effects are not applied to the border.
- Border Spacing: Change the spacing between the border around the text and the text itself. (in pixels)
- Fill: Enable this option if you want the background of the text object to be filled with a specific color.
- Fill Color: Change the background color of the text object.
- Corner Rounding: Specify an amount of rounding for the border.
When you specify a text color for a specific wallpaper, this
text color is now also used as default color when rendering text on
your layout. Previously the default layout text color was always
white.
NOTE: When you specify
"Automatic" as text color for your wallpaper then Wallpaper Cycler
will still use white as default color for layout text because the
text color is calculated after the desktop has been rendered and
that color is then used for the icons on your desktop.
Frame Object
A frame object can be used to draw a frame on your layout or to apply a certain effect to a part of the background. A frame object has the following object-specific settings.
- Border Width: Specify the width of the border around the frame object. Set this to 0 if you don't want a border.
- Border Color: Specify the color of the frame around the frame object.
- Border Effects: If this is enabled, the effects you have setup in the general settings part of this object are also applied to the border. If this is disabled, the effects are not applied to the border.
- Interior Effects: If this is enabled, the effects you have setup in the general settings part of this object are also applied to the interior of this frame object. If this is disabled, the effects are not applied to the interior. Disabling this setting can be useful when you have a frame object without a "Fill" and with effects applied only to the border. This allows you to create some nice looking effects.
- Fill: Enable this option if you want the background of the frame object to be filled with a specific color. If this is disabled, the background of the frame will be completely transparent.
- Fill Color: Change the background color of the frame object.
- Corner Rounding: Specify an amount of rounding for the border.
Calendar Object
A calendar object allows you to put a nice calendar on your layout. The following is a list of calendar-specific settings.
- Calendar: When you click this button, a new dialog appears which allows you to customize your calendar object. Learn more about the calendar object.
Calendar Notes Object
A calendar notes object allows you to put a calendar notes bar on your layout. The following is a list of calendar notes specific settings.
- Calendar Notes: When you click this button, a new dialog appears which allows you to customize your calendar notes object. Learn more about the calendar notes object.
|
Copyright © 2009 NuonSoft |